You read the horror stories, model horses arrive with ears sticking out of the boxes, broken limbs, no padding....the list goes on and on. I wanted to make an easy to follow guide on how to pack a model horse such as a Breyer for safe travels with the least cost to you. This post is geared to model horses, however the techniques can be used for packing nearly anything for shipment!
Step 1: Pick The Right Box! Size does matter!
 |
| Make sure you don't accidentally pack up your feline assistant! |
Remember me mentioning the horror of models with ears/tails/hooves poking through their shipping box a minute ago? Well that is easily prevented by choosing a box that is large enough to contain your model, with a nice cushion of 2+" around. That being said, the model doesn't have to sit square in the box. I have gotten by with placing the model in at an angle in a smaller box but still having that nice safety cushion. The box should be reasonably strong. You don't have to spring for heavy duty, but you should get something reasonably strong. Find free boxes, save boxes from the items you order online. It's ok to reuse a box provided it is not damaged! It can even have writing on it. Ask friends, neighbors, stores, anyone to save boxes for you! Storage an issue? Flatten the box and slide behind furniture, behind a door, under the bed...you get the picture.
Step 2: Mummify Your Horse.
I start by wrapping the horse in a soft material. I have a nice box of thick soft low lint paper towels by Scott (like the blue ones used by mechanics). I go for the white to avoid color transfer. Ideally you don't want the bubble wrap touching the horse, although from my understanding that is more for customs rather than original finish as the top coat is sometimes affected by temperature. I completely surround the horse with the soft material, using tape (on the material, never tape to a model!) to keep it in place.

After the soft material, I start in with the bubble wrap. I end up wrapping each horse differently depending on leg position. For this horse I wrapped each leg with a strip of bubble wrap, secured in place with tape...in this case masking tape. I like masking tape as it is easy to see when unpacking! Sometimes I will cut strips of cardboard to place between the legs so they cannot bend into each other, however that wasn't really an option with this model. After the legs are done, I wrap the head and the tail. These are the most vulnerable parts, so extra wrap here is beneficial. Then the whole horse is wrapped in bubble wrap. In this case it was about 2 layers of the small bubbles. Ideally I would do one layer of little bubbles and one layer of big bubbles. As the horse is protected by the soft material, go ahead and go bubble side down. If you don't wrap the horse in a soft material, go bubble side up in case there is a problem with the finish. However, you must have a couple paper towels laying around?
Where do I get my bubble wrap? I save every scrap from any packages that come into the house. My boyfriend is a mechanic,and he will get large pieces that come with glass shipments. Once again, ask friends, neighbors, coworkers to save packing supplies for you! Yay, more free stuff! However if you are doing more shipments than you can get free supplies for, I have found decent bubble wrap for cheap from a seller on
Amazon (no, they aren't paying me or anything, I am just a happy customer).
Step 3: Everyone wants a comfy ride, even model horses!
Cushion Cushion Cushion. Did I mention Cushion? Remember how I said you need a box with some space around the model? This is why! When you pack, you want to be certain no part of the horse is in direct contact with the box. When a box takes a hit, the item touching the edge is what will absorb the impact. These horses are not rubber, you don't want them to absorb impact. That is why there are air pockets, or newspaper, or more bubble wrap. Ideally, air pockets are great, but they are hard to come by. If you have a place to store them, an
Amazon seller has a great price! I am stingy with my air pockets, as you can see. I have them placed between the head and tail of the box and under the feet. I fill in the rest of the space with newspaper, packing paper. I don't subscribe to the newspaper, so I get those free local newsletters (which I have found are worth reading before using as packing material! Coupons and event calendars!). Once again, save all the packing materials! Seriously! I have even gone as far as to take bubble mailers that have been used and I open them up and use them as a cushion on the top and bottom of the box!
Step 4: Check for Movement
After filling in all the empty space in the box, hold it closed and give it a gentle shake from side to side and up and down. Does anything shift? If so, open the box, recenter the horse and add more packing materials! A well packed box will not have anything shift inside, but there also will be nothing exerting pressure on the outside of the box either. You do not want any bowed sides! Just think how if it moves under a gentle shake, how much more impact your poor model will receive in the hands of the shipping service! We've all likely seen/heard the stories of employees who just don't care. Sad but true.
Step 5: Use Online Labeling
So now we are to the dreaded final part. You have taped up the box and it is ready to go. You have a couple choices....either print at home or go to the Post Office/Shipping Center. I personally HATE going to the post office...nothing against the employees, there just is often lines and it is very hard/painful for me to stand for that long. Obviously, I chose the print at home method. If you know me in person, I am a printer Nazi....seriously. I don't want to waste a drop of ink. I have my printer set to print on Black and White Draft Setting. It comes out plenty dark, I have yet to have a complaint. Through eBay, I changed the settings so it only prints the label, no receipt. Obviously, most people aren't as obsessive over saving ink, but I am. I will print out my label (which is half a page) then save the 2nd half to run through again! For smaller boxes, you can adjust the "zoom" in the printer setting! On some of my small boxes and envelopes I do as little as 75% of the full size page so it fits.
So you are wondering what is involved in printing your own labels? The only thing you need is a scale, ruler/tape measure and a computer hooked to a printer. I use a food scale. Once again, I have yet to have any issues with weights being off. You can pick up a cheap digital scale. I do recommend one that has a bowl on it for larger packages so you can still read the display!
My preferred shipping provider is USPS as 99% of the time for the items I ship they are the most affordable option. For that 1% of large (multiple dimensions over 12"), overweight (5lbs+) packages, I now turn to UPS. I ship the most through eBay. It is extremely easy. When your buyer pays, hit "Print Shipping Label" A page will come up with a place to select the shipping service, enter the dimension and weight of the box, and add additional services. For items less than 13oz, USPS First Class Package works great, almost all my packages get to their destination before the estimated date. Tracking is included as well, but no insurance. It's up to you if you want to add it. I generally don't, it's a risk I'm willing to take. For items greater than 13oz but less than 16oz, you can still use first class, but for a few cents more you can go with Priority and get insurance included! A Breyer Traditional will be around 2-3lbs packed properly, so Priority is your best choice. There are a couple economy class services by USPS, but for the price difference I prefer Priority, plus it is 3 days or less to the buyer! Customers like quick shipping!
The process through PayPal to print a shipping label is similar if you invoiced your customer (very easy, but another post for another day). Basically you select the shipping service you want, enter the dimensions and weight, select any additional services like insurance and click calculate shipping. From there you can pay and print your label. Very straight forward.
As a semi related side note: always pay for and have your customers pay for Goods and Services. Never use the send to friends feature unless you are actually friends. Both you and the buyer are covered under Goods and Services if something goes horribly wrong...the fees are minimal, you can always add that extra to the price of your item to cover it. As a buyer I have even offered to pay the fees just to cover myself. There are
online fee calculators to help you know how much to send!
Want to know a random secret I found one day while researching how to ship cheap? This
link right here takes you to a PayPal page where you can print First Class Postage online (normally you can't do that through the post office website or without an existing PayPal transaction) You even get the discount! Yes, despite what you heard, PayPal and eBay still offer shipping discounts to sellers! You're welcome. Easy to use, input your address, buyers address and then the usual select shipping service, enter dimensions and weight, select additional services, calculate, purchase, print, done.
You can also print postage direct through the USPS site. Once again all you need are the address, dimensions and weight of your package. This applies to Priority Mail and First Class International.
Oh no....I said International! Yes I did. It really is nothing to be afraid of. I personally limit which countries I ship to. I avoid places like the Middle East, Africa, and Asia. I am not being prejudice at all. If someone were to contact me from a place I don't normally ship to, I would definitely look into it and try to get it done. I have shipped to Canada, Australia, Germany, and the UK. The biggest thing is to be honest on the customs forms. Use online shipping from the Post Office or PayPal if you are nervous, they walk you right through it, much easier than trying to decipher the paper customs forms! Always say you are shipping merchandise regardless of what your buyer wants you to put, as you are. Unless of course it truly is a gift and no money is changing hands. eBay offers the Global Shipping Program you can use for no charge, although some buyers seem to not like it. I often offer it and have used it multiple times with no problems. All you see is a domestic shipment to a center in KY (at least on the East Coast), then they take care of the rest for you.
Once your postage is printed, cut it out (seriously, don't be that person to stick half a sheet on the box!) and I simply use standard scotch cellophane? tape, you know, the tape every office has; clear or matte, about 1/2" wide. Some people laminate the label with packing tape, but that just runs up costs. Scotch tape is less expensive and works fine. Side note: don't cheap on shipping tape! You want your box to remain closed the entire journey! I personally like Duck brand (once again, no compensation) as it is the least expensive yet quality. I buy it at
Walmart for $7.44 for 4 rolls. It does last a while.
Controversy: To Mark Fragile or Not to Mark Fragile, that is the Question
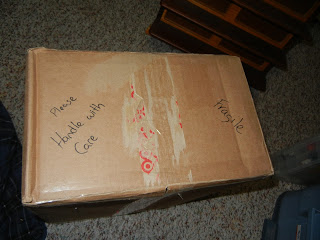
So there seems to be controversy over whether or not a package should be marked fragile or not. I never was marking packages as fragile, and they seemed to arrive fine. I started marking as fragile, or simply writing "Please Don't Crush". I avoid writing in all caps. I use Please. Who knows if it makes any difference, I just think if I were a shipping employee, I'd appreciate a nicely written message rather than all caps yelling at me! It's up to you though.
Well, this turned out a bit longer than I had planned....to recap:
- Size Does Matter. Choose a box that will allow at least 2" of padding all the way around your model.
- Mummify your model. Use a soft material such as low lint paper towels to wrap your model, then use copious amounts of bubble wrap. Remember: there is no such thing as too much bubble wrap. Use at least 2 layers.
- Everyone wants a comfortable trip. Center your model in the box, use air pockets or rolled/balled up newspaper to fill in the cushion space, and the rest of the space.
- Check for movement. A properly packed item will not shift at all if you shake the box, nor will the sides of the box be bowed out from too much padding putting pressure on it.
- Label your box. Printing postage at home is not as scary as it sounds, even international postage! All you need is a scale (food scales work!), ruler/tape measure, and a computer hooked to a printer!
The potential total cost for shipping like this? Less than $1, maybe a few cents for tape, a piece of paper and ink (draft setting is your new best friend!). Save packing material from your own purchases. Ask friend, family, coworkers, employers and businesses for free boxes and packing materials that were destined for the dumpster anyway. As long as it is clean, there is nothing wrong with recycled materials!
Here are three more of my money saving shipping methods:
- Did you know you can get FREE shipping supplies directly from USPS that are not flat rate (Flat Rate is never the best unless your item is very heavy!)? You can. I recommend:
- Did you know USPS will pick up packages for FREE at your door? I am not sure if it is available in all locations, but I live in a mobile home park and they do it! The only places I think it may not work is in apartment complexes, but who knows?
- Did you know you can drop off prepaid packages at your local Staples for both USPS and UPS? You just walk in and leave them on the counter. No lines no waiting. Works great if you miss the mailman! You can also buy Priority mail postage and UPS shipping labels there....but why bother when it is so simple to do yourself!
After rereading this...I think USPS, Amazon and Walmart should pay me to write this! If only....lol.


